
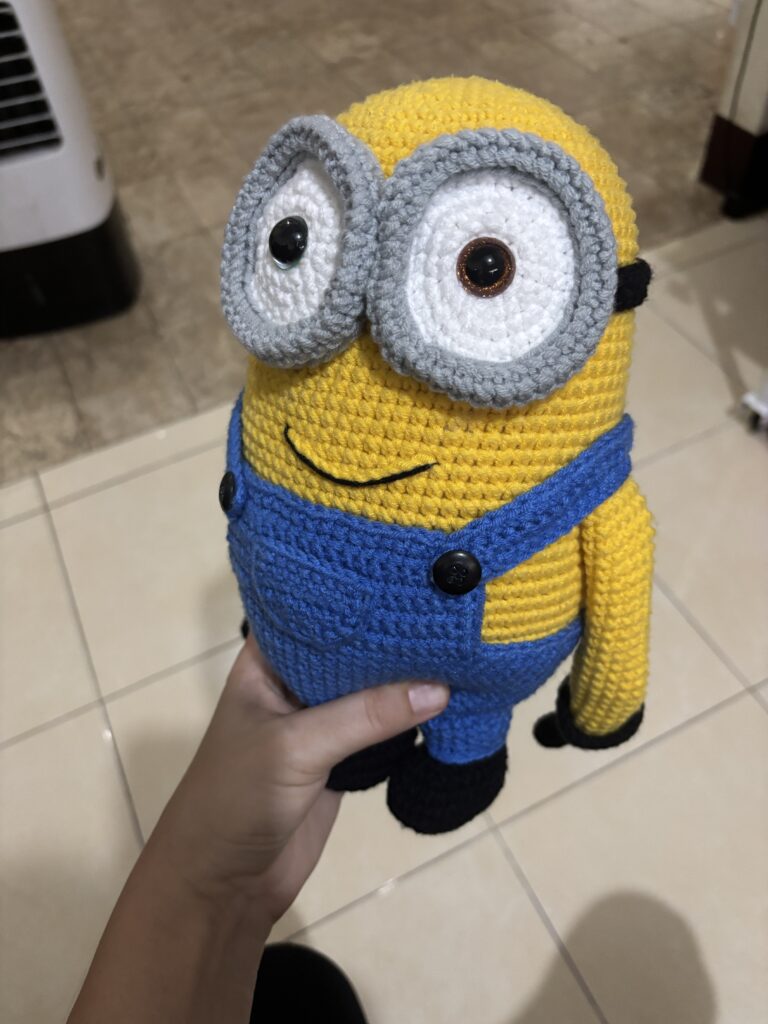
This is a totally free crochet pattern for my favorite Minion = Bob. He's got his teddy with him and teddy is of course included in the pattern.
Size:
Minion Bob is 25cm/10inch tall when made with the recommended yarn.
Materials needed:
Yarn: DK weight yarn. I used 4ply milk cotton yarn and that yarn is exactly the same as Catona's Softfun yarn. You will need these colors:
- Yellow: 230-260m/ 250-285yd
- Blue: 110-140m/ 120-155yd
- Black: 90-120m/ 100-130yd
- White: 30-60m/ 35-65yd
- Grey: 30-60m/ 35-65yd
- Brown: 60-90m/ 65-100yd
- Green: small amount (for if you want crocheted eyes)
- Dark brown: small amount for the teddy’s nose
- Light pink: small amount for the tongue
**If you click on the yarn colors, it will take you to the Dutch website Haked.nl where this yarn is available. You can of course use different yarn. (These are not affiliate links. I do not earn any money from linking to that yarn. I just want to make it easier for you to see which colors are good)
Crochet hook: 3mm
You will also need: stuffing, scissors, tapestry needle, one 17mm brown safety eye, one 17mm green safety eye, two 15mm cream colored buttons, two 15mm black buttons,
**Minion Bob's eyes are 2 different colors. 1 is brown, the other green
**The safety eyes can be replaced with crocheted eyes
**The black- and cream-colored buttons can be replaced by crocheted buttons
Abbreviations (US terms):
- Ch: chain
- Slst: slip stitch
- Sc: single crochet
- Hdc: half double crochet
- Dc: double crochet
- Inc: increase
- Dec: decrease
- MR: magic ring
- BLO: back loops only
- FLO: front loops only
- R: row
Extra info:
- The color needed for the row is mentioned at the beginning of the row. Is nothing is mentioned, then use the same color as the previous row
- The ch1 (or 2) from ch1 and turn does not count as a stitch
- Always crochet in both loops UNLESS STATED OTHERWISE
- The **1, **2, ... at the end of some rows, tell you which pictures goes with that row
Copyright info:
Even though this is a free crochet pattern, the same copyright laws as patterns you pay for still apply. This means you cannot print it to distribute/share, sell it, claim it as your own, post it on your own website, post screenshots or pictures of the text online or on social media, … You can also not use this pattern for a YouTube vidoe. If someone asks where they can get the pattern, you can share the link to the pattern.
You may sell the finished doll but not the pattern itself.
PATTERN:
Minion:
Body:
R1: with yellow: 6sc in a MR
R2: inc 6x (12)
R3: [1sc, inc] repeat (18)
R4: [1sc, inc, 1sc] repeat (24)
R5: [3sc, inc] repeat (30)
R6: [2sc, inc, 2sc] repeat (36)
R7: [5sc, inc] repeat (42)
R8: [3sc, inc, 3sc] repeat (48)
R9: [7sc, inc] repeat (54)
R10: [4sc, inc, 4sc] repeat (60)
R11: [9sc, inc] repeat (66)
R12: [5sc, inc, 5sc] repeat (72)
R13-45: 72sc
R46: [5sc, dec 5sc] repeat (66)
R47: [9sc, dec] repeat (60)
R48: [4sc, dec, 4sc] repeat (54)
R49: [7sc, dec] repeat (48)
R50: [3sc, dec, 3sc] repeat (42)
R51: [5sc, dec] repeat (36)
R52: [2sc, dec, 2sc] repeat (30)
R53: [3sc, dec] repeat (24)
R54: [1sc, dec, 1sc] repeat (18)
R55: [1sc, dec] repeat (12)
- Stuff now
R56: dec 6x (6)
- Cut the yarn
Pants:
R1-12: same as R1-12 of the body but with blue
R13: [35sc, inc] repeat (74)
R14-20: 74sc
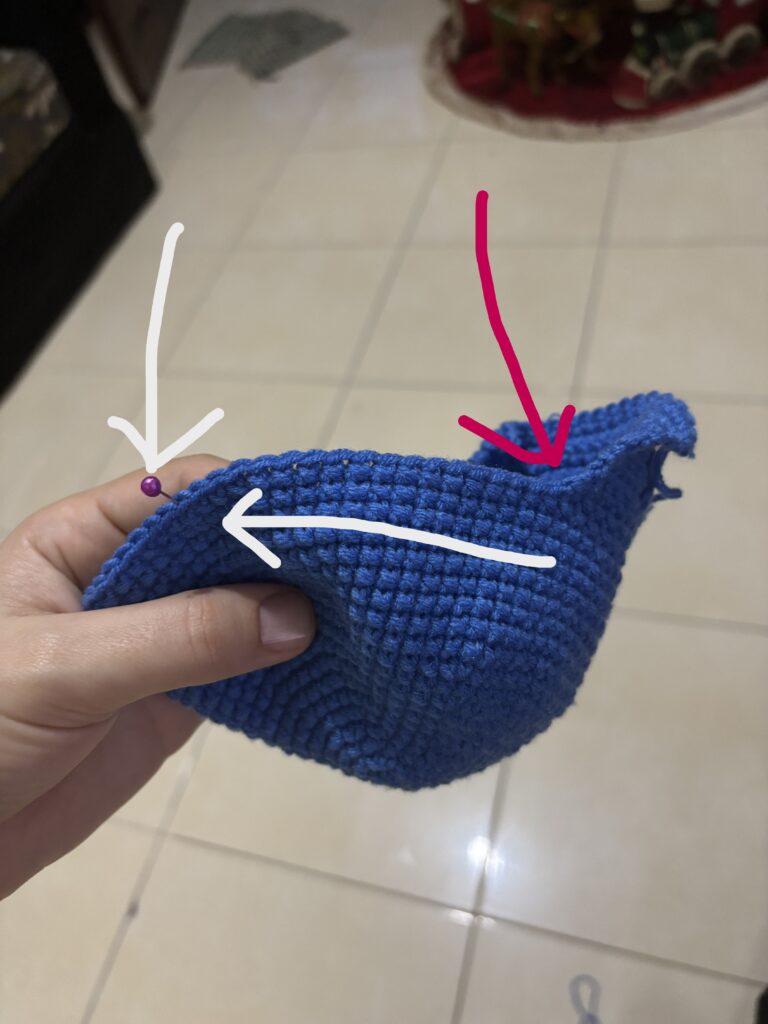
R21: 20sc, ch1 and turn
- Leave the rest of the stitches unworked for now
R22-28: 20sc, ch1 and turn
R29: 20sc
- Cut the yarn
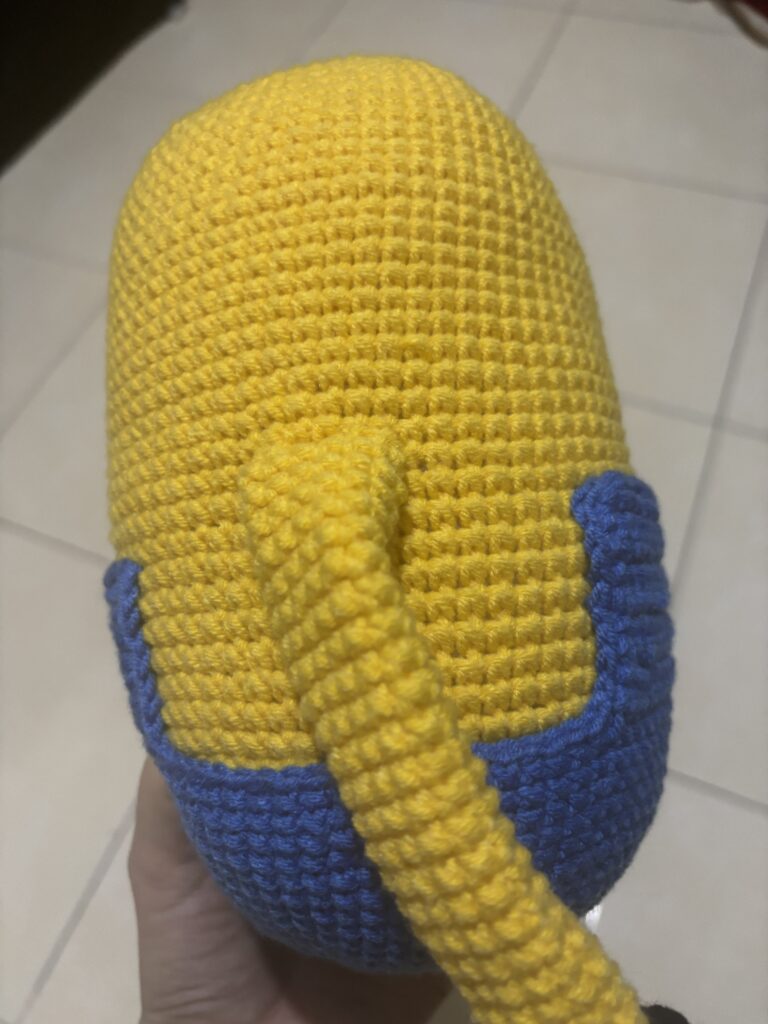
- Count 18 stitches from there (**1, pink arrow) to the left (**1, white arrows)
- Start the following in that 18th stitch:
- Repeat row 21-29 there (crochet R21 towards the unworked left, not back to where the pink arrow is in my picture)
- Then:
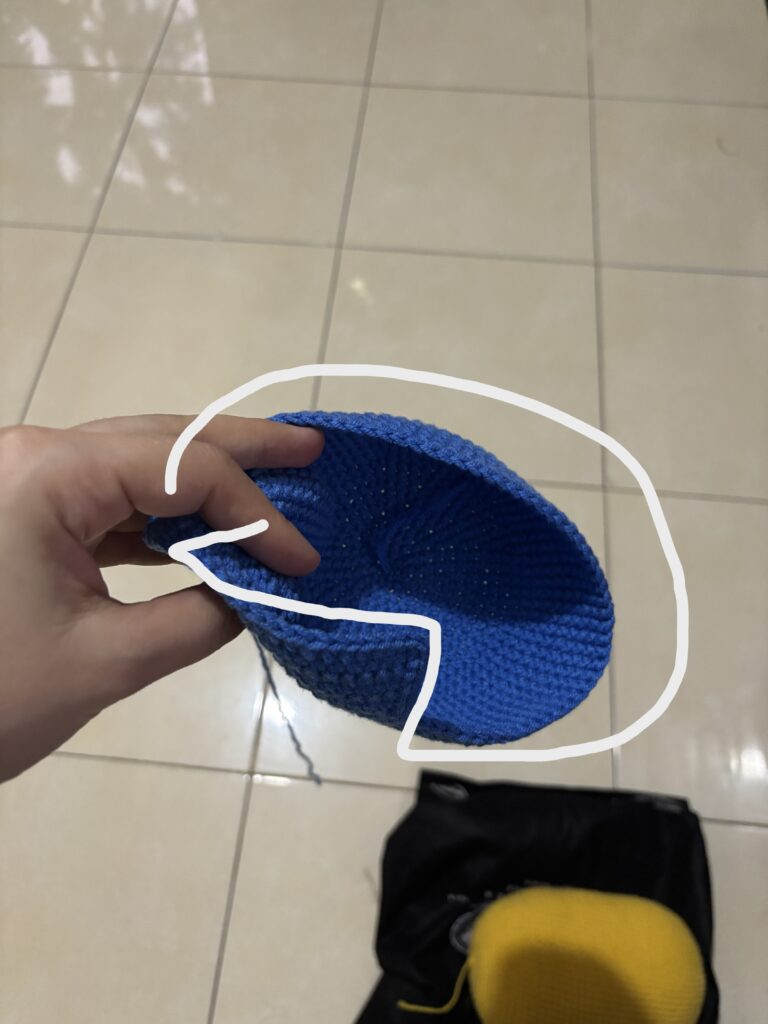
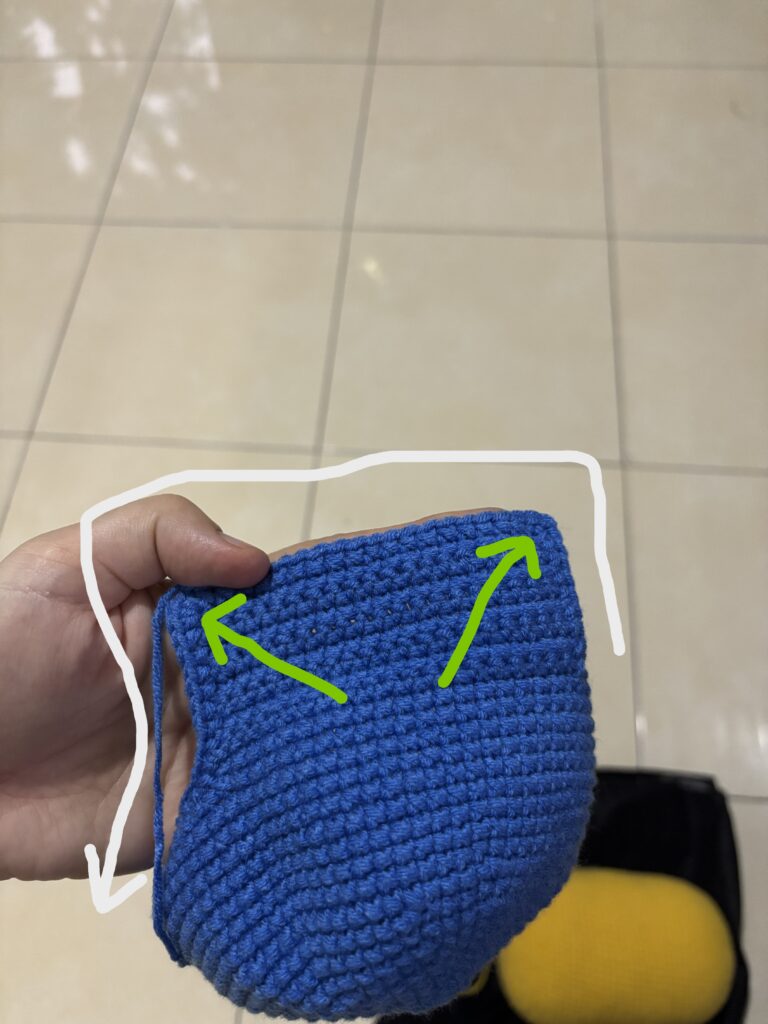
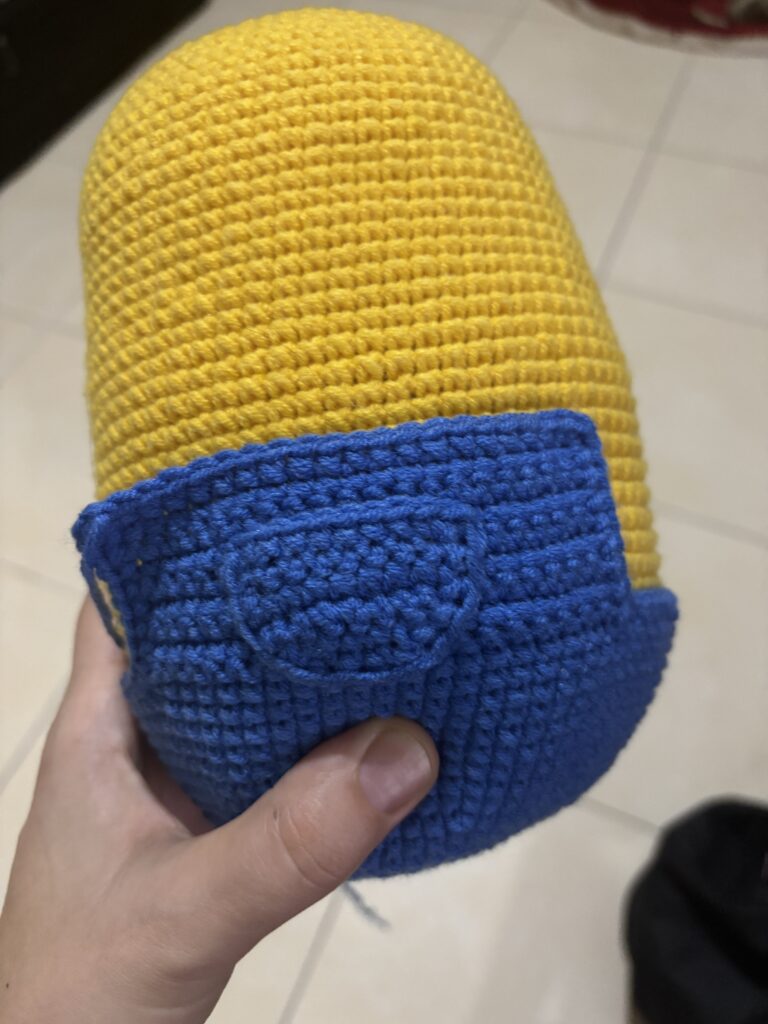
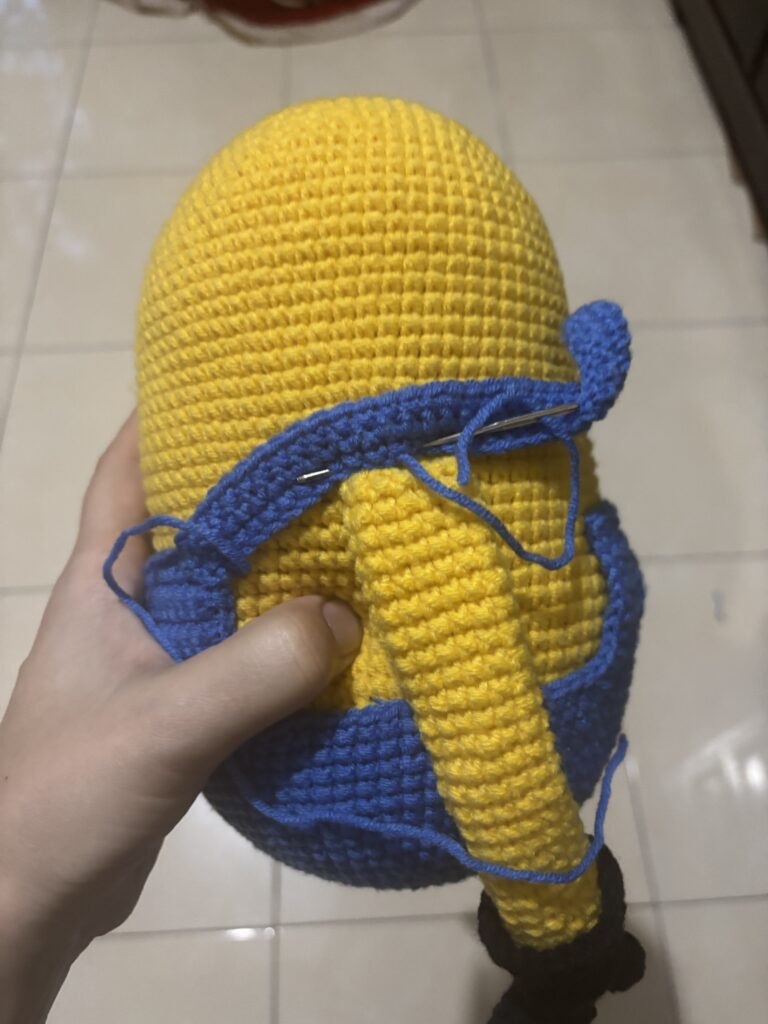
R30: crochet all around the edges of the pants (*2-3, white lines) and make an inc in the corners at the top (**3, green arrows)
Pocket:
R1: with blue: ch9
R2: start in the 2nd ch from the hook: 8sc, ch1 and turn
R3: 8sc, ch1 and turn
R4: dec, 4sc, dec, ch1 and turn (6)
R5: dec, 2sc, dec, ch1 and turn (4)
R6: make sc all around in all sides and make an inc in the 2 corners at the top
- Make 1slst in the 1st stitch
- Cut the yarn but leave a long tail
- Sew the pocket on the front of the pants (**4)
- Sew the pants in place (**5)


Arms (2x):
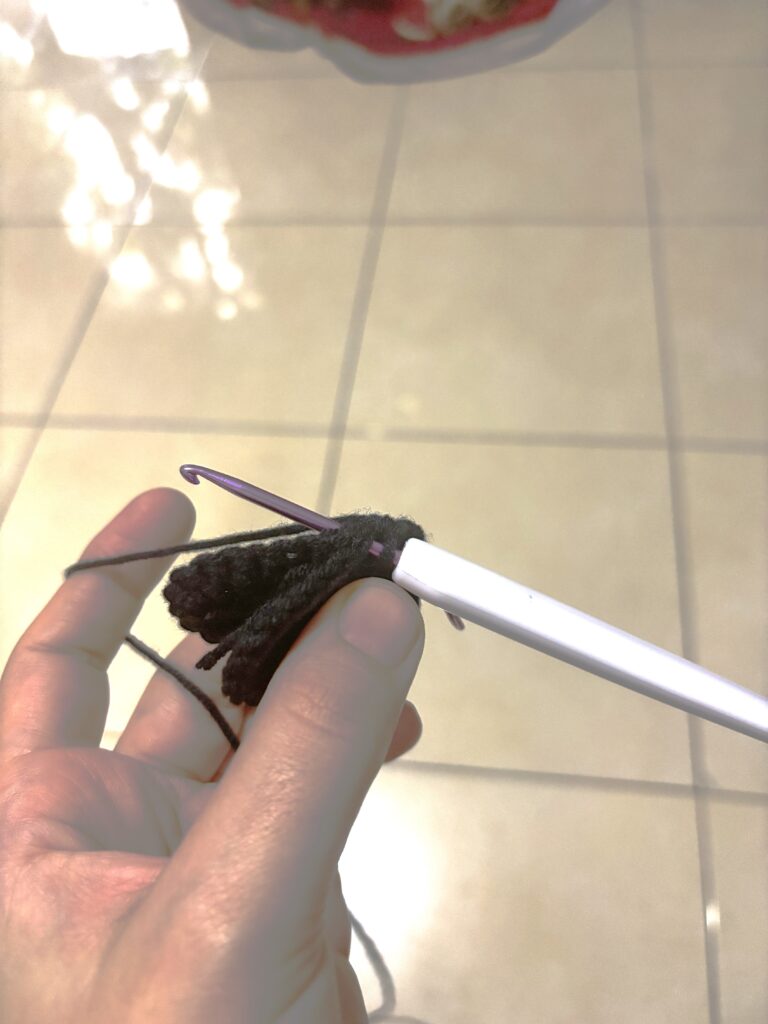
R1: with black: 6sc in a MR
R2-4: 6sc
- Cut the yarn but leave a tail
- Make 3 such fingers but do NOT cut the yarn after making finger 3
- Instead do the following to connect the fingers:
R5:
- Step 1: 5sc in finger 3,
- Step 2: 2sc in finger 2,
- Step 3: 5sc in finger 1,
- Step 4: skip 1 stitch of finger 2 and then make 2sc in finger 2
- That is 14sc in total. There are several stitches of the 3 fingers not used and those are to be left like that for now
- Crochet the next rows in continuous rows
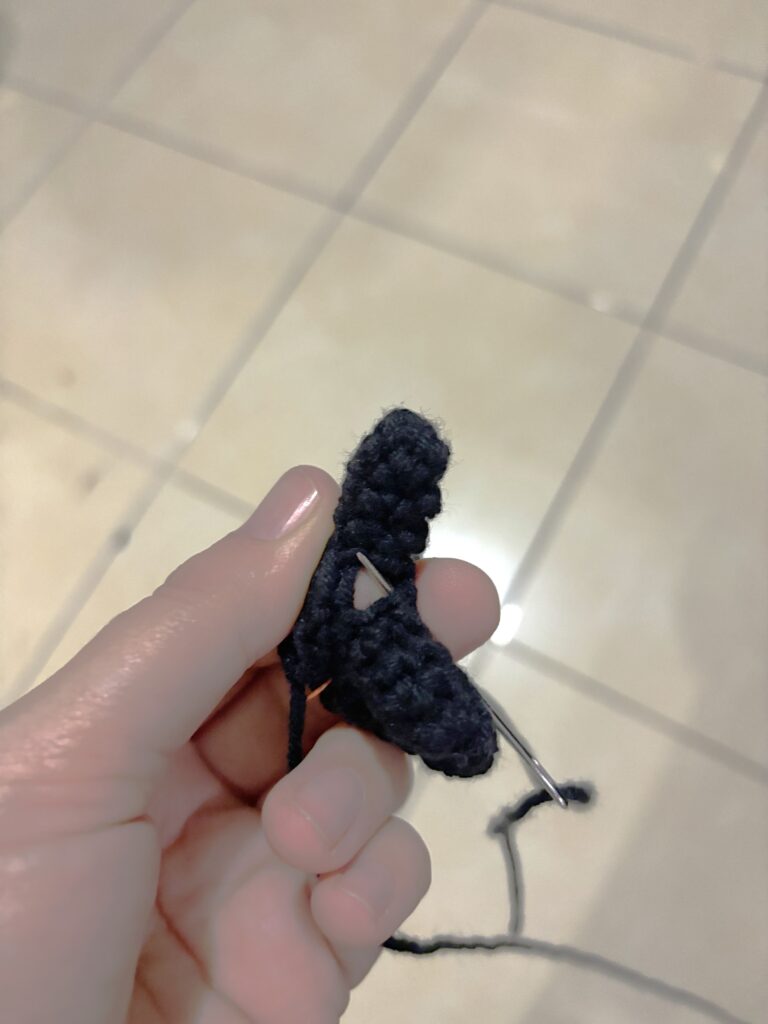
R6: start this row in stitch 1 of R5 and crochet in only the stitches of R5: 7sc, inc, 6sc (15)
- Sew the holes between the finger closed (**6), then continue with R7
R7-8: 15sc
R9: 1sc, dec, 5sc, dec, 5sc (13)
R10: 4sc, dec, 7sc (12)
- Stuff the fingers but not the hand yet
R11: FLO: [3sc, inc] repeat (15)
R12: [2sc, inc, 2sc] repeat (18)
R13: [5sc, inc] repeat (21)
- Make 1slst in the 1st stitch
- Cut the yarn
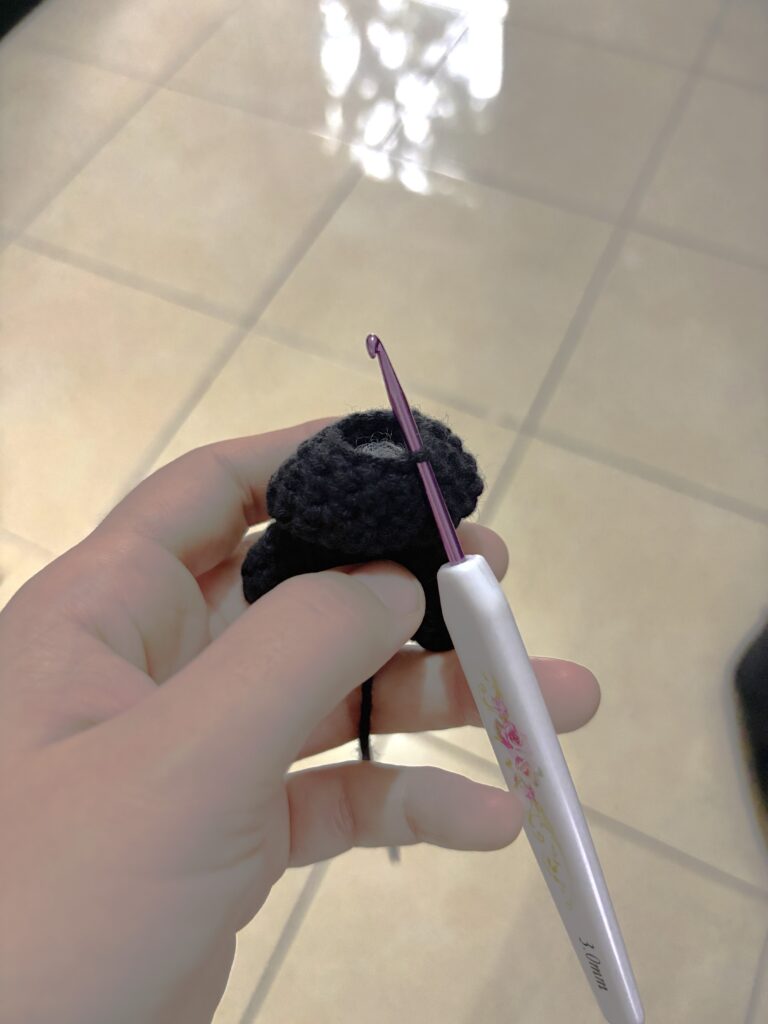
- Temporarily fold the last 3 rows down till you can easily reach the BL of R10 (**7)
- Attach yellow yarn to a BL of R10
R1: with yellow: in BL of R10: 12sc
- Stuff the hand
R2-25: 12sc
- Cut the yarn but leave a tail for sewing
- I did not stuff the arm part, only the hand
- Make a 2nd arm the same way
- Sew them in place (**9-10)

Straps (2x):
R1: with blue: ch31
R2: start in the 2nd ch from the hook 30sc, ch1 and turn
R3: 30sc, ch1 and turn
R4: 30sc
- Cut the yarn but leave a tail for sewing
- Make the 2nd strap the same way
- Sew the straps in place with R1 on the bottom and R4 on top (**11-13)


Legs (2x):
R1: with black: ch6
- You need to crochet around the chain now. Watch this tutorial if you don’t know how: https://youtu.be/s5NcBYBqZ0M?si=GHYvQk0DdOXi3EuE
R2: start in the 2nd ch from the hook: inc, 3sc, inc 2x in the last ch, then on the other side continue with: 3sc, inc (14)
R3: inc 2x, 3sc, inc 4x, 3sc, inc 2x (22)
- Make 1slst in the 1st stitch
- Cut the yarn
- Make a 2nd piece the same way but this time do not cut the yarn
- Place the 2 pieces with their backsides facing, on top of each other and crochet them together the following way (**14):
R4: 1sc, inc, 1sc, inc, 3sc, inc, 1sc, inc, 2sc, inc, 1sc, inc, 3sc, inc, 1sc, inc, 1sc (30)
**Ignore the weird color my skin has in the picture below. I had to brighten the picture really a lot so that the stitches are visible. Black yarn is very difficult to photograph well.
R5: BLO: 30sc
R6: 30sc
R7: 11sc, dec 4x, 11sc (26)
R8: 9sc, dec 4x, 9sc (22)
R9: 7sc, dec 4x, 7sc (18)
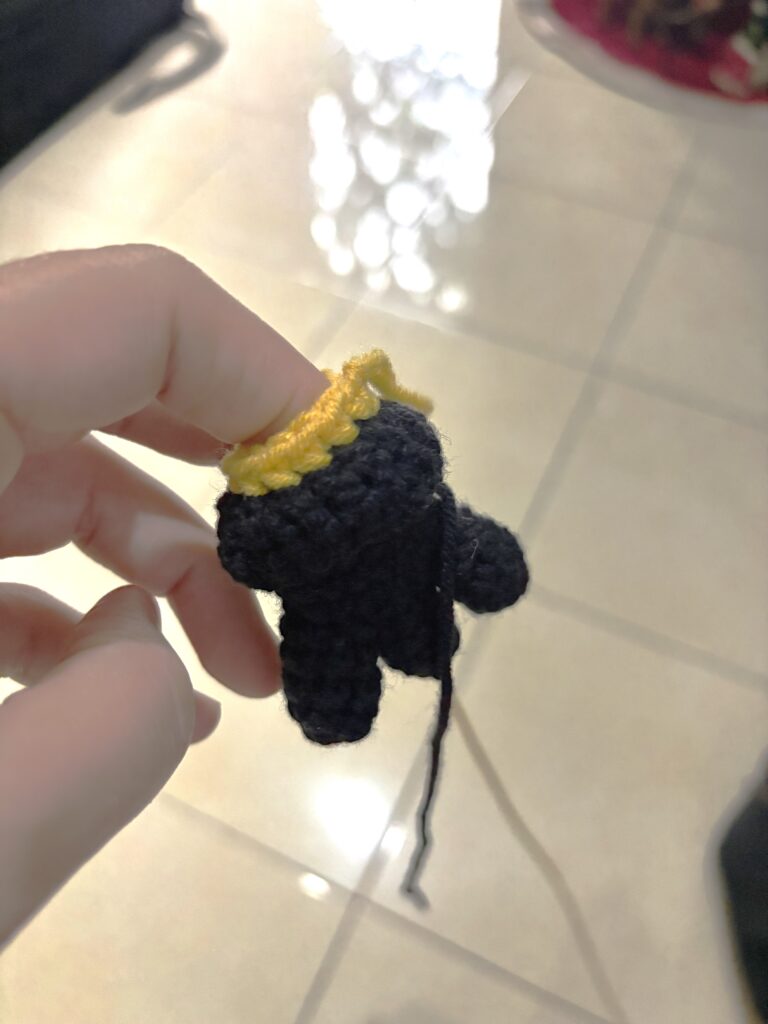
R10: with blue: FLO: 18slst
R11: BLO: 18sc
- Stuff now
R12: [4sc, inc, 4sc] repeat (20)
R13: [9sc, inc] repeat (22)
R14: [5sc, inc, 5sc] repeat (24)
R15: [3sc, inc] repeat (30)
- Stuff the leg
- Make a 2nd leg the same way
- Sew them in place (**15-16)

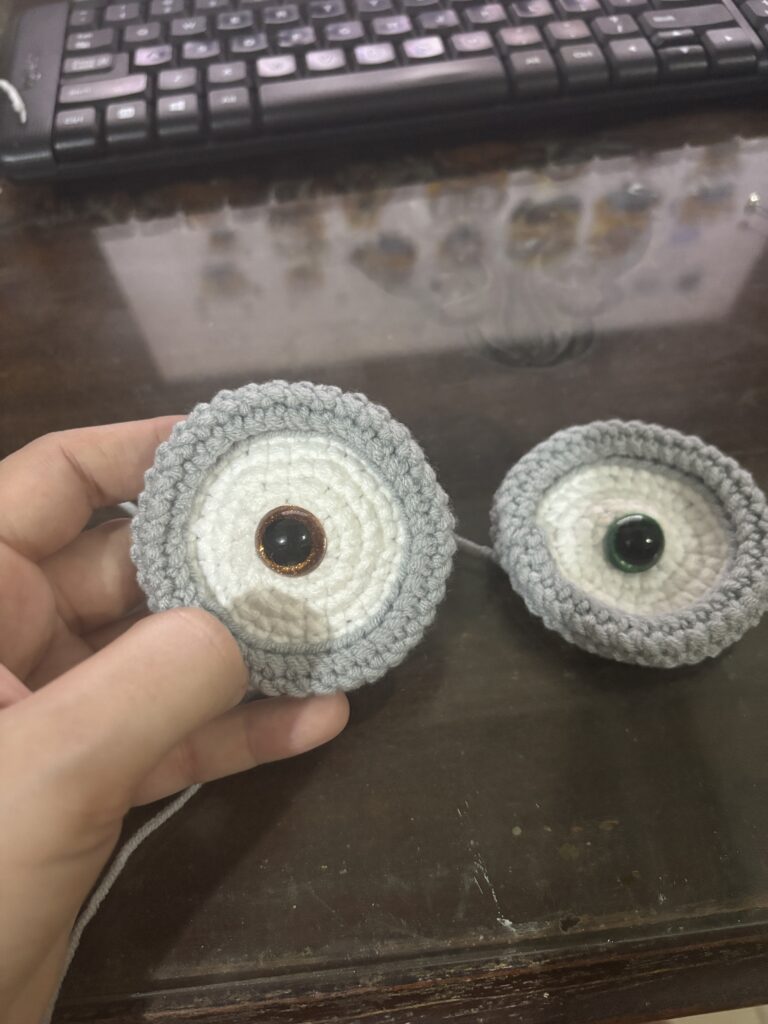
Glasses and eyes:
Part 1:
R1: with white: 6sc in a MR
R2: inc 6x (12)
R3: [1sc, inc] repeat (18)
R4: [1sc, inc, 1sc] repeat (24)
R5: [3sc, inc] repeat (30)
R6: [2sc, inc, 2sc] repeat (36)
R7: FLO: with grey: 36slst (not sc)
R8: in BL of R7: 36sc
R9-10: 36sc
R11: 36sc again but this time crochet the stitches together with the BL of R6 (**17)
- Make 1slst in the 1st stitch
- Cut the yarn but leave a long tail
- Make a 2nd part 1 the same way

Part 2:
R1: with black: ch46
R2: start in the 2nd ch from the hook: 45sc, ch1 and turn
R3: 45sc
- Cut the yarn but leave a tail
- If you want to use safety eyes: insert a green eye and a brown eye into the magic rings of the parts 1 (**18)
- Sew part 1 and 2 in place (**19)
- You can also crochet the eyes if you want (see pattern below)
- Sew a mouth (**20)
- Attach buttons where the straps are sewn on the front side of the pants (**20)

Crocheted eyes (2x):
**This is only for if you want to use crocheted eyes instead of safety eyes
R1: with black: 6sc in a MR
R2: with brown: inc 6x (12)
- 1slst in the 1st stitch
- Cut the yarn
- Make the 2nd eye the same way but replace brown with green
- Sew in place (**21)

Teddy:
Head and body:
R1: with brown: 6sc in a MR
R2: inc 6x (12)
R3: [1sc, inc] repeat (18)
R4: [1sc, inc, 1sc] repeat (24)
R5: [3sc, inc] repeat (30)
R6: [9sc, inc] repeat (33)
R7: [5sc, inc, 5sc] repeat (36)
R8-13: 36sc
R14: [2sc, dec, 2sc] repeat (30)
R15: [3sc, dec] repeat (24)
R16: [1sc, dec, 1sc] repeat (18)
R17: [1sc, dec] repeat (12)
R18: [3sc, inc] repeat (15)
R19: [2sc, inc, 2sc] repeat (18)
R20: [5sc, inc] repeat (21)
R21: [3sc, inc, 3sc] repeat (24)
R22-28: 24sc
R29: [1sc, dec, 1sc] repeat (18)
R30: [1sc, dec] repeat (12)
- Stuff now
R31: dec 6x (6)
- Cut the yarn
Legs (2x):
R1: with brown: 8sc in a MR
R2-6: 8sc
- Cut the yarn but leave a tail
- Make the 2nd leg the same way
- Sew them in place (**22)

Arms (2x):
R1: with brown: 8sc in a MR
R2-9: 8sc
- Cut the yarn but leave a tail
- Make the 2nd arm the same way
- Sew the arms in place (**22)
Ears (2x):
R1: with brown: 6sc in a MR
R2: inc 6x (12)
R3-4: 12sc
- Cut the yarn but leave a tail
- Make the 2nd ear the same way
- Sew the ears in place (**22)
- Sew 2 buttons as eyes (**22)
- Sew a nose with dark brown yarn (**22)
Tongue:
R1: with light pink: 6sc in a MR
- Do not close the magic ring
- Cut the yarn but leave a tail
- Sew in place (**22)
- Sew the teddy in Bob's arm and secure Bob's hand also (**23)
That's it! Minion Bob and his teddy are ready!
Do let me know what you think about the pattern in the comments section below. You can also post a picture of the finished Minion in my Facebook group: Amigurumi Heaven (Craftygenesindonesia)


Goedemiddag,
Dat 4 ply garen, waar kan ik dat kopen??
Vriendelijke groet
Aukje
Dat is 4ply melk katoen van Ali. Deze garen zijn exact hetzelfde als Softfun van Scheepjes en Cosy fine van Durable. Beide zijn verkrijgbaar op de Nederlandse site Haked.nl
Dankjewel!
Graag gedaan
Beste lezer. Ik ben bezig met dit leuke patroon alleen mis ik foto 14 hoe de voeten aan elkaar gehaakt moeten worden
Hallo,
Voor een onbekende reden was die foto verdwenen. Nu staat die er terug op en hopelijk blijft de foto deze keer staan…
Dank u wel voor de gratis patroontjes
Heel graag gedaan
Dank je wel
Graag gedaan 😁
dank je wel
Deze is heel leuk.
Bedankt