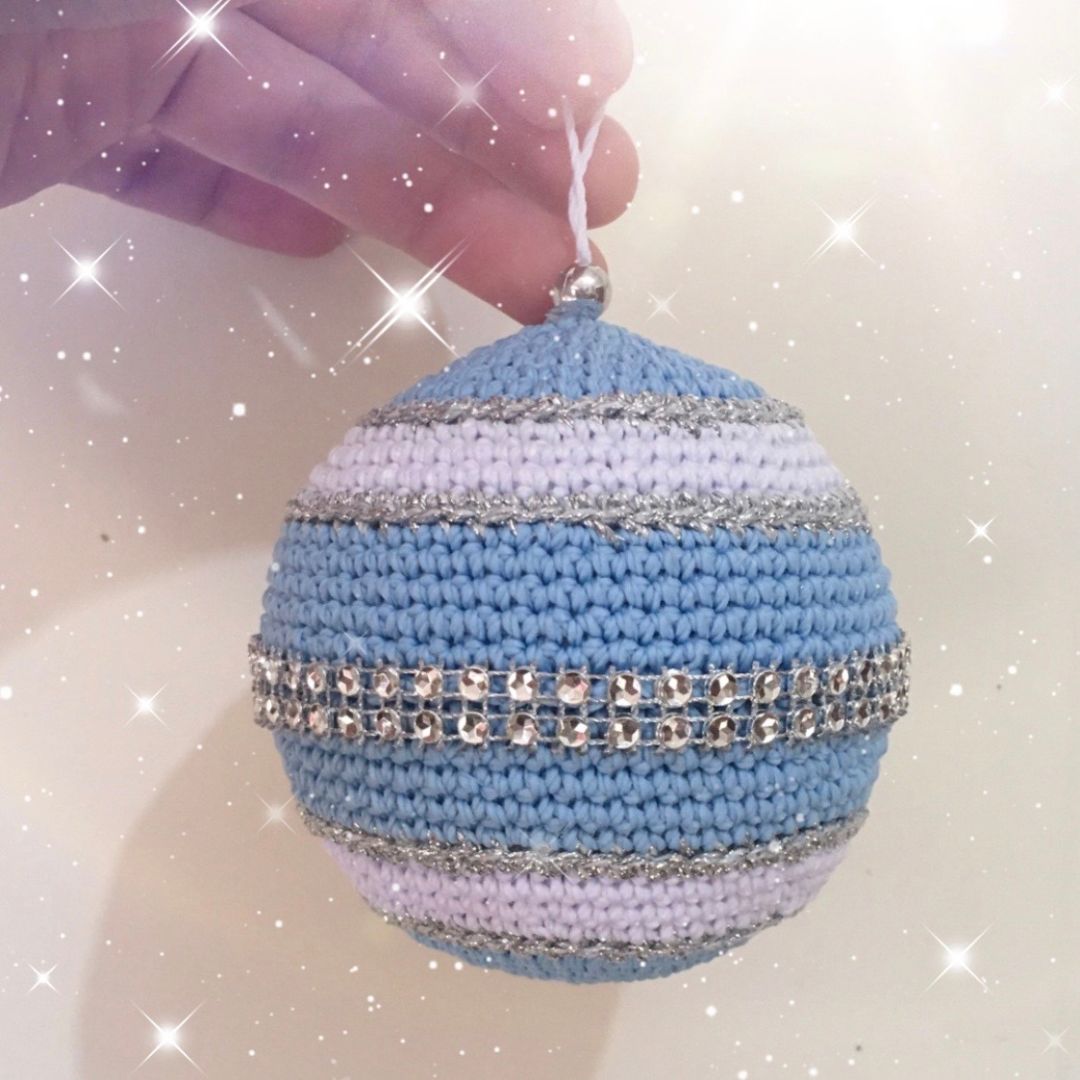
Click here if you would like to purchase the pattern in PDF format, WITHOUT ads and sent to you by email.
Supplies
Yarn: light weight (3) yarn suitable for a size 2mm crochet hook in:
- white
- red
- metallic silver
Crochet hook: 2mm
Tapestry needle – scissors – stitch marker – 80mm styrofoam ball
**If when you’ve made both ornament pieces you see that the styrofoam is too small, then you’ll need to either remove a row (or 2) or get a bigger styrofoam ball.
Abbreviations: (click on the stitch name to go to a tutorial about that stitch)
- Ch(s): chain(s)
- Sl st: slip stitch
- Sc: single crochet
- Hdc: half double crochet
- Dc: double crochet
- Inc: increase = make 2 single crochet in the same stitch
I used a spike stitch in this pattern. If you do not know how to make a spike stitch, you can find a good and clear tutorial here.
The color of yarn you are to use for your row is mentioned at the end of the row. When nothing is mentioned, use the same color as the previous row.
Work only in back or front loops when this is mentioned. When nothing is mentioned, work in both loops.
Important information: (click here to go to a really good tutorial about how one reads the rows)
*2sc, inc, 2sc* repeat till the end = 2sc, inc, 2sc, 2sc, inc, 2sc, 2sc, inc, 2sc, …
*3sc, inc* repeat till the end = 3sc, inc, 3sc, inc, 3sc, inc, 3sc, inc, …
**This crochet pattern is a FREE PATTERN but it is copyrighted = you CANNOT sell it, claim the design as your own, publish it, distribute it, print and distribute it, print and share it, post it online, publish it online, post it on Facebook, translate it, copy it, … in any way or form without my permission!!!
You are allowed to sell the finished product (the ornament) BUT NOT THE PATTERN ITSELF!!!
If someone you know/on Facebook/… is asking for the pattern, DO NOT PRINT AND SHARE IT WITH THEM and DO NOT COPY AND PASTE AND SEND IT DIGITALLY OR ON SOCIAL MEDIA/CHAT APPS TO THEM. Instead give him/her/them the link to the pattern and send them to this page on my website.
Pattern
**At the end of every row you are to connect the last stitch to the first with a slip stitch (I call that a connecting slip stitch). Then ch1 if the next row starts with single crochet, ch2 if the next row starts with half double crochet and ch3 if the next row starts with double crochet. This chain DOES NOT COUNT AS A STITCH.
**Start the next row in the very same stitch in which you made that connecting slip stitch, NOT in the next stitch.
Row 1: 12dc in a magic ring with red
Row 2: 2dc in every stitch around (24) with metallic silver
Row 3: *3dc in the first stitch, ch1, skip the next stitch of row 2) repeat till the end (48dc/ch) with white
Row 4: 1hdc in every dc + 1 spike stitch in row 2 under the chain space (48) with red

Row 5: 1hdc in every stitch (48) with metallic silver
Row 6: *7hdc, 2hdc in the next stitch* repeat till end (54) with white
Row 7: 1hdc in every stitch (54) with red
Row 8: 1hdc in every stitch (54) with metallic silver but right in the middle between 2 red spike stitches, you make 1 spike stitch in row 5

Row 10: 1sc in every stitch (54) with red
Row 11: 1sc in every stitch (54) with metallic silver
Row 12: 1sc in every stitch (54) with white
- yarn off but leave a long tail
- make the second half of the ornament but only till row 10
- Then sew the 2 pieces around the styrofoam ball and make a loop at the top that will fit around the branches of your Christmas tree


- If the ball is too big: add row 11 + 12 to the second half of the ornament
- If the ball is too small: you’ll need to get a bigger one
If you have any questions about this pattern, click here to send me a message.
I would love to see your Christmas ornament made with this pattern so feel free to post a picture of it on social media and tag me there so I know you’ve posted the picture. You can also post it in my Facebook group: Amigurumi Heaven.